Thursday, 9 September 2010

Neuchatel Part2- WOSTEP

For all it's reputation, WOSTEP turned out to be a very unlikely place. It is a charming former house on the lakeside road. I was told it was built in 1907. I had expected a high rise set-up humming with activity. Instead it is a very cosy place with just 6 students in the 2 year full training programme. It is obvious they focus on quality :-)

Since I have got prior experience with watches my test was a little different. The others were asked to file a block of brass into as perfect a cube as was possible. I, on the other hand, was asked to service an ETA 2892. This is an automatic movement with (quick-set) date complication. I had never worked on this movement before. It has some unusual features e.g. the winding gears & the offset train. So, I took quite a bit of time to do this task. I am happy to say that the movement was working after I was done with it :-)

The next task was to cut a piece of brass in a 'V' shape.
like this....
And then it had to be filed so that it matched perfectly, one way......

...or the other.
Looks easy but it takes a lot of careful filing to get the two pieces to match perfectly. If the job is well done, one should not be able to see any light gaps between the two pieces.

For the last task, we were given a couple of hairsprings & tweezers.

We were asked to form numbers from 0 to 9 with the hairsprings. This was probably the most delicate task. Hairsprings have a mind of their own & there is a knack to getting the shapes one wants. Here is what I managed. In my defence I will say that my handwriting is terrible as well :-)

Apart from these three tasks, we had to fill out a questionnaire with some maths problems and questions on gears & levers. So that is what the two day test was like.

Aditya

Wednesday, 1 September 2010

Neuchatel Part1- The Town

I shall split my trip to Switzerland into 2 posts, one about the town and the other about WOSTEP & the test.

I came to Neuchatel by train. Swiss railways, in my limited experience, appeared to be supremely organised and well run. All the information one might need is easily accessible. The officials are polite & well informed. The trains ran on time, literally to the minute.

Here is the station building, rather severe looking :-)
My hotel, L'Aubier, was about 10 minutes walk downhill. It is basically a cafe on the ground & first floors with rooms above. This part of the town dates back to the 15th century. Please note the clock tower, you can see it in other pictures.
The picture below perfectly shows the nature of Neuchatel. This picture is taken from the top of the prison tower looking roughly north. To the right (east) is lake Neuchatel, to the left (west) are the Jura mountains. In between is the town of Neuchatel. The roads near the lake are level but the ones near the mountains climb steeply, sometime at 16 degrees! You can see the clock tower over my hotel in the middle of the picture.


Beyond the lake, looking south-east are plains and then the Swiss Alps.


An interesting observation deck built by the lake.

Below you can see one of the ports along the lakeside road. In the background is the grand post office building.


The oldest part of town, where my hotel was, is made up of quaint winding streets. Below you can see the prison tower I mentioned earlier.


Fountains like the one below dot the town.


The other parts of Neuchatel, to the north & south of this area, are somewhat newer. All in all it is a very beautiful town. Of course, it is very expensive. I do believe that a Mcdonalds meal is a good indicator of how affordable a place is :-) A decent sized Mcdonalds meal here will set you back by about CHF 14!

Hope you enjoyed this mini tour of Neuchatel.

Aditya

Thursday, 19 August 2010

Happy Day!

Haven't posted for quite a while. Partly because Avi has kept me busy, and partly because I have been preparing.

I had applied for the WOSTEP training programme earlier this year and they said they would like to interview and test me in August. The visa has been granted, therefore 'happy day' :-). So, I am off to Switzerland on Saturday.

I am quite excited and nervous about the whole business. The test will be conducted over two days. There will almost certainly be some sort of practical test. I am quite confident I can do it. What worries me a bit is that, being self taught, I hope I have not developed any 'bad habits'. Lets see how it goes. It's about time I got some education :-)

Aditya

Wednesday, 21 July 2010

The Dial (part-2)

So, we had pasted the template on the dial and marked out the position of the marker track. Next is the slow and tedious job of drilling/ milling out the 60 holes for the dial markers. First I drill them all out with a 0.4mm bit & then mill out the hour markers with a 1.0 mm end mill.

The blued steel markers will fit through the 1.0 mm holes. Absolute accuracy of alignment is essential, since the eye can detect even the minutest of deviations.

A lathe with an indexing attachment or a CNC mill might make this job easier. I even must explore laser etching. Now, the sticker is removed, the job is remounted on the turns and the final finish is applied to the dial. After this, there will be no further opportunities to do so.

The ring is parted....

....the outer diameter is turned down.....

...and the dial is done!

A close up shot.

Hope you enjoyed this. Plating is all that remains.

Aditya

Monday, 19 July 2010

Luch Ultra Thins

I saw a beautiful 14k Poljot ultra thin on another blog, here
(Russ, I do hope you do not mind me posting this link)


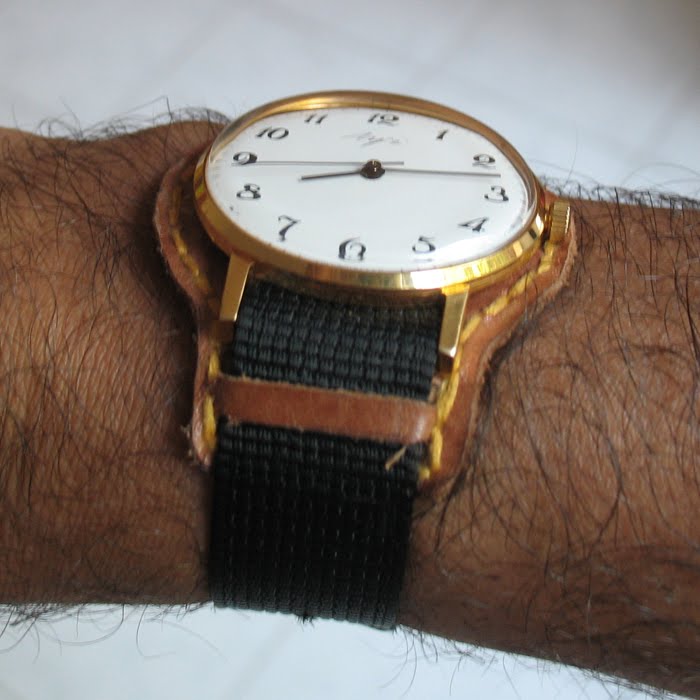
So, I thought I might share my Ultra thins. They are branded Luch but I believe they use the same movement as the Poljot. Of course, these two have plated cases, I wish they were solid gold :-)


The gold one got a service as soon as I received it. Here is what the insides look like.


Since I sweat a lot, I destroy plated cases in no time. So, I made a little case protector for this watch out of an old wallet.

Admittedly this is not a 'dress watch' look but at least I can wear it without worrying about the case.

Saturday, 17 July 2010

The Dial (part-1)

We now come to a very delicate and (cosmetically) important part of my watch- the dial. Every stage of making the dial is crucial . One slip-up destroys the whole job and you have to start over. Functionally, the dial must have the correct sized hour & minute markers, the marker track should be centred & it should sit flush on the movement. Aesthetically, the brushed finish & the radius must be carefully applied. Altogether, the dial is a very demanding part.

So, I start with a brass plate 45mm square & about 0.7 to 0.8 mm thick.

As usual, one surface is planed on the glass sheet- central relief for the arbour is drilled- holes for the retaining screws are drilled & the corners are cut off. The plate is mounted with the plane side OUT. Note, this is the under surface of the dial.

Now, the usable area is sandpapered to give it a circular brushed finish & a track is relieved for the 12, 3, 6 & 9 o’clock blued steel markers. This track accommodates the underside of the blued steel markers but it also helps with the overall legibility of the other markers.

Now the job is reversed. This is the top surface that one will see in the watch. First the central area is cut out. Then the central hole is finished to the correct diameter.

Then the usable area is faced & turned down to just over the required thickness. A little is left for the final sandpapering.

Now a printout with 60 radiating lines is stuck on the job. Please note that the job is still mounted on the attachment. The track for the markers is marked on the turns. This ensures that the track is concentric. Below you see the job with the track marked out, removed from the attachment & ready for drilling. In fact you can see that one 0.4 dia. hole has already been drilled.Everything on track so far, but with a dial you can never relax. So, this is where I am today, more in the next post.

Aditya

Friday, 9 July 2010

Movement Ring

I made two movement rings earlier this week. This means, the dial, hands and case clamps remain to be made. Here is how the ring was made-

I started with a piece of brass 50mm square by about 3mm thick.

This piece is drilled in the centre to allow the arbour of my attachment to pass. Then it is drilled sequentially for the retaining screws.Here it is mounted on the attachment. Please note that the face presented to the attachment has been planed with sandpaper on a piece of glass. A circle has been scribed as a guide to cut off the corners. The corners foul with the tool rest assembly.Here you can see that the corners have been cut off. I have also started a cut to remove the central portion (red arrow)Central portion cut off.Now the portion I want to use is faced. After this the two faces of the job will be parallel. This faced portion is then turned down to the required thickness. Also, a seat is cut for the movement (red arrow). I suppose all movements have a lip on the outer edge. This one does, so a seat must be cut for it.Now the job is removed from the attachment & tried for the internal diameter.After some adjustments & fine tuning the ring is parted off.In the picture below you can see how wasteful this method really is. A very small part of the original piece is actually used. Once I get a lathe with a chuck I could use a brass pipe of a suitable size to make the ring. This will minimize wastage.Next, I finished the outer diameter. For this the ring is held on the attachment with a plate. This whole assembly is self centring.The chamfer is turned…..
….and the ring is done.All I need to do now is to make the slot for the stem.

Aditya