Friday 22 October 2010

skeletonising, Part3

So I have cut out most of the material with a fretsaw. Now the plates and bridges must be filed down with needle files to the required shape. You can see needle files in the picture below.

This is a very delicate task. The part must be held in a vice so that one can file it and yet the vice must not damage the part. Crushing the part, pushing in a steady pin etc. are potential hazards at this stage. Also, filing must be done carefully. Thin areas can be distorted by filing, so these need some sort of support. Any mistake and the watch will not work. This is why skeletonising is more than just sculpture. In the end the watch must work and keep time!

A few days of careful filing results in this, the bridges....

... and the dial plate.
Everything look fine, except ......... please see the next few images...........


As you can see, the flanks of the bridges look terrible. The file gives you the correct shape but the surface that has been filed is quite unsightly.

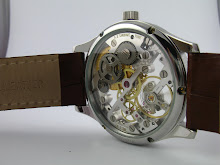
A few more days of sanding the flanks with emery paper stuck on brass strips and this is what you get.......


..... a nice, even brush finish.

Next, we deal with the inner surfaces. hope you enjoyed this.

Aditya

Wednesday 20 October 2010

Skeletonising, Part2

The moment of truth; time to put saw to movement!!!

Well, not quite. Before that I need to transfer the design onto the plates and bridges. I made a template on a polypropylene sheet. This allows me to see through the template (very important if you want to align about two hundred microscopic holes!)
Then I drill holes at all the corners.

Next, I play connect-the-dots with the fretsaw.

This is the beginning of material removal. I leave lots of margin. Even so, the final design is faintly visible at this stage. Here is the dial-plate....

....and the bridges.

There is lots of filing to be done!!!

Aditya

Saturday 16 October 2010

Skeletonising, Part1

So after all the preparation and making new parts we come to a not-too-unimportant aspect of making a skeleton watch, Skeletonising :-)

Here is a 'before' picture of the movement
Of course, the movement needs to be disassembled. Here is a picture of only the bridges & plates.

The first thing I do is fix the dial on to the movement. It is important to do this now. The alignment will be difficult once most of the material has been removed. This is the reason why I made all these parts before I touched the movement. in the picture below you can see the dial plate in the movement ring.

Now the dial is placed on this assembly & aligned properly. Markings are made at the 12 & 6 o'clock positions; small diameter holes are drilled; and these holes are broached till the dial markers go through. If you look carefully, you can see the markers in the picture below (sorry for the poor quality image)

Here, I would like to talk about the way dials are mounted on the movement in most watches (including the one that donated this movement). I think it is safe to say that 99 % of watches today have dial feet soldered to the undersides of the dial. These go through holes in the dial plate. Screws in the periphery of the movement press onto the dial feet and hold the dial in place. All ok so far, except that I have seen too many vintage & antique watches with broken dial feet and dials floating about in their cases.

This is the reason why in No.1 I have made the 12 & 6 o'clock markers go through the dial & main-plate. On the other side I will drill a small hole in the dial marker & put a brass taper pin through it to hold the whole assembly together. All will be clear when I actually do it & post pictures.

Anyway, a small problem cropped up. The hole for the 6 o'clock marker was too close to a feature on the edge of the movement. So I had to fill the feature up. You can see the filler ( brass coloured) in the picture below.

This is held in place with a screw. I made the screw out of an old, rejected dial marker. So I am a happy man :-)

In the next post, I will write about actually starting the skeletonising. Perhaps this post should have had a different title :-)

Aditya