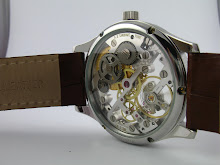
In the two pictures below you can see how all the hard work on the anglage has paid off. The blue steel dial marker. I really like the way the minute hand gracefully arches towards the dial. On to 03 now!
Hi! I Really like your work man! Im starting myself to do some decorating or skeletonizing to my movements, but where can i find any good information how is it done properly, because i dont want to ruin my movements. Is there some place, where you got your infromation before you started to work on those watches. anyway if you have any tips or warnings (what not to do :D) on skeletonizing i'd be glad to hear from your experience!
Thanks for the kind words. Unfortunately I am not aware of any one book or resource that teaches skeletonising.
The most important thing, while skeletonising, is to know how a watch mechanism works. It is essential to know the approximate torques at each pivot, the way the keyless work functions etc. in order to be successful.
I taught myself all of this. There are many sources on-line that will teach you about watches.
You can start on some cheap movements and move to nicer ones once you gain confidence.
For my No.1 skeleton wristwatch I also made a 3D CAD model & checked my design thoroughly before I even touched a movement. But, since it is a hobby for you, I suggest you just have fun :-)
Hi Aditya, I am a resident of Bangalore and have been looking around for where I could get custom built watches. Would you be willing to sell one of your creations or take a custom-order ? Please let me know on my email: sup__riyo__b277__[at]yahoo.com (Ignore the underscores in the mail.. meant for spam avoidance)
A D Sambhare has been in the forming for several years. I have always been drawn to and interested in the inside of watches and have been exploring my love for watches by collecting and repairing antique pocket watches for years.
On this blog I intend to share the making of my watches and also other interesting watch related stories


Hi! I Really like your work man! Im starting myself to do some decorating or skeletonizing to my movements, but where can i find any good information how is it done properly, because i dont want to ruin my movements. Is there some place, where you got your infromation before you started to work on those watches. anyway if you have any tips or warnings (what not to do :D) on skeletonizing i'd be glad to hear from your experience!
ReplyDeleteJanne.Korkee@gmail.com
Hi Janne,
ReplyDeleteThanks for the kind words. Unfortunately I am not aware of any one book or resource that teaches skeletonising.
The most important thing, while skeletonising, is to know how a watch mechanism works. It is essential to know the approximate torques at each pivot, the way the keyless work functions etc. in order to be successful.
I taught myself all of this. There are many sources on-line that will teach you about watches.
You can start on some cheap movements and move to nicer ones once you gain confidence.
For my No.1 skeleton wristwatch I also made a 3D CAD model & checked my design thoroughly before I even touched a movement. But, since it is a hobby for you, I suggest you just have fun :-)
Hope this helps
Aditya
Hi Aditya,
ReplyDeleteI am a resident of Bangalore and have been looking around for where I could get custom built watches.
Would you be willing to sell one of your creations or take a custom-order ?
Please let me know on my email: sup__riyo__b277__[at]yahoo.com
(Ignore the underscores in the mail.. meant for spam avoidance)
I have sent you a mail :-)
ReplyDelete