

This is a very delicate task. The part must be held in a vice so that one can file it and yet the vice must not damage the part. Crushing the part, pushing in a steady pin etc. are potential hazards at this stage. Also, filing must be done carefully. Thin areas can be distorted by filing, so these need some sort of support. Any mistake and the watch will not work. This is why skeletonising is more than just sculpture. In the end the watch must work and keep time!
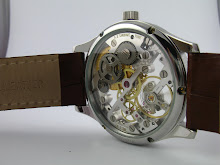
A few days of careful filing results in this, the bridges....

... and the dial plate.

Everything look fine, except ......... please see the next few images...........


As you can see, the flanks of the bridges look terrible. The file gives you the correct shape but the surface that has been filed is quite unsightly.
A few more days of sanding the flanks with emery paper stuck on brass strips and this is what you get.......


..... a nice, even brush finish.
Next, we deal with the inner surfaces. hope you enjoyed this.
Aditya
never knew you are documenting your experiences..great stuff in here so much for a novice like me :)
ReplyDeletewas about to share some info on the aeternitas mega 4 but you prolly must come across it
http://www.perpetuelle.com/NewsDetails.aspx?NewsId=144
Is that Sachin Kadam?
ReplyDeleteThanks for the compliment. Writing a blog is great. It pushes one to think & consolidate the learning from any activity. You should write a blog about your photography, do you already?
I have seen images of the Frank Muller Grand complication. It certainly is a great technical achievement. But the designer in me finds the dial too cluttered and messy. I wish they had made it more readable.
Aditya