
I started with a piece of brass 50mm square by about 3mm thick.
This piece is drilled in the centre to allow the arbour of my attachment to pass. Then it is drilled sequentially for the retaining screws. Here it is mounted on the attachment. Please note that the face presented to the attachment has been planed with sandpaper on a piece of glass. A circle has been scribed as a guide to cut off the corners. The corners foul with the tool rest assembly.
 Here you can see that the corners have been cut off. I have also started a cut to remove the central portion (red arrow)
 Central portion cut off.
 Now the portion I want to use is faced. After this the two faces of the job will be parallel. This faced portion is then turned down to the required thickness. Also, a seat is cut for the movement (red arrow). I suppose all movements have a lip on the outer edge. This one does, so a seat must be cut for it.
 Now the job is removed from the attachment & tried for the internal diameter.
 After some adjustments & fine tuning the ring is parted off.
 In the picture below you can see how wasteful this method really is. A very small part of the original piece is actually used. Once I get a lathe with a chuck I could use a brass pipe of a suitable size to make the ring. This will minimize wastage.
 Next, I finished the outer diameter. For this the ring is held on the attachment with a plate. This whole assembly is self centring.
 The chamfer is turned…..
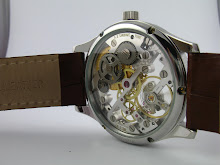
 ….and the ring is done.
 All I need to do now is to make the slot for the stem.

Aditya
Great stuff Aditya! You are probably the only one I know in India who does all this on his own!
ReplyDeleteDidn't know making a ring took so much effort! Quite fascinating :)
ReplyDeleteAbsolutely Fascinating,many thanks Aditya.
ReplyDeleteRegards,
Russ.
Thanks for the kind words gentlemen!!
ReplyDeleteTurning was very difficult when I tried it for the first time but it has only got easier with practice.
Aditya
Hi,
ReplyDeleteThis is beautiful work! Did you part off the ring with a graver? How were you able to keep the outer diameter perpendicular to the face?
Thanks!
Carl
Carl,
DeleteThanks for the kind words. As I mentioned in the post, the whole assembly is self centering. The part on the attachment that receives the job is conical. So, this sort of centres the internal diameter. Also, there is the plate pressing down on the ring. These two together help to centre the ring. It is a bit difficult to put down in words but, with practice, one develops a feel for the whole thing. Hope this helps
Aditya
Thanks! Would you be willing to post some pictures of your turning equipment at some point? I'm trying to put together the accessories (gravers, cutters, work carriers, etc.) that i'll need to use a bow driven turns. I've been having trouble getting good information on this and you seem to get great results with this equipment.
ReplyDeleteThanks!
Carl
Carl,
ReplyDeleteapologies for the late reply. If you email me (id at the top of the page) I can send you a little PDF article on the turns. It is an old article from the BHI journal that someone very kindly sent me.
Aditya