Sunday, 27 March 2011

THE COLLECTION: Unknown Tissot movement

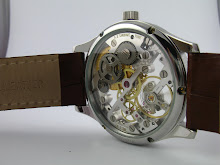
This is a movement I bought a few years ago. It is a ladies pocket watch movement, something that makes it ideal for a wristwatch project :-)
Even before disassembly, it appeared to be of very good quality. The layout is typically Swiss.

There was a surprise under the dial, the Tissot name. However, I have been advised that this is not
the Tissot. I would be very obliged if anybody could throw some light on this Tissot.

On barrel bridge we can see this 'HB' logo. Also, the regulator is marked 'fast-slow' as against 'avance-retard' which was more common on the continent.


It is evidently a good quality movement. It has a Breguet over-coil hairspring. The balance, lever & escape wheel pivots are capped on both sides.


An interesting feature is the side, English type of lever. This indicates an early date. Perhaps before the entire Swiss industry adopted the anchor escapement.
Every part reeks of quality. even parts that would only be seen by a watchmaker have been carefully finished.


This movement is fortunate to still have the Geneva stop-work intact. This is a feature little understood by watchmakers & was generally discarded during servicing.

The only real problem this movement had was with the balance. As you can see in the picture below, the roller table was miss-aligned and, indeed, loose.
... an easy fix on the staking set.

I hope you enjoyed reading about this beautiful movement. One day I will make a nice dress watch using it :-)

Aditya

Thursday, 17 March 2011

Finishing small parts

I have spent the last few weeks finishing various small parts that go into the movement. I want 02 to be absolutely perfect.

Below you can see some of the parts from the keyless work. All the parts have had their flanks & top surfaces straight grained and edges bevelled. The screw heads have been polished.

------------------------------


Part of the cannon pinion & centre pinion will be seen through the minute hand hub. These have been polished too.

------------------------------


The movement screws have had their heads & ends polished. The ends will be visible from the dial side. The flanks of the screw heads have been straight grained.
------------------------------


Here are the dial markers. The heads have been domed & mirror polished. The flanks of the heads are straight grained.

The ends have been polished as well.
------------------------------


The winding wheel has been skeletonised, bevelled & straight grained. The click & transmission wheel have straight grain finish on the top surfaces. I think the wheels will look interesting when the watch is wound since a straight grain finish changes with the light.

------------------------------


The end of the barrel arbour.
------------------------------


The balance spring stud holder (I have left the regulator alone since finishing the top surface will disturb the curb pins).
------------------------------


The crown, castle & intermediate wheels from the keyless work.
------------------------------


and finally, the barrel & motion works.

I hope all this effort pays off :-)

Aditya

Sunday, 27 February 2011

The Hands Part4- Finishing

Now that the profile of the minute hand is frozen, the two hands can be hardened. This is done by heating to red & quenching in water. The hands must be bound in wire since the heat treatment can distort them. After hardening the hands are tempered to spring. This ensures that they will retain their shape throughout the finishing process & indeed when the watch is serviced.

After tempering the absolute final shaping is done with the escapement files.


Then the flanks & top surfaces are finished with paper and the edges are bevelled.

This is the result........

A close-up...

Now all that remains as far as the hands are concerned is bluing.

Aditya

Friday, 18 February 2011

The dial (mounting) & hands (shaping)

We have reached a stage where things start coming together. I need to give the hands their final shape for which they need to be in the watch for which the dial needs to be mounted on the movement for which the dial markers need to be finalised....... whew, that's a lot of work :-)

So, the first thing I need to do is drill the holes for the taper pins in the dial marker feet. Please note that the marker feet are 1mm in diameter and the hole is 0.4mm.
Here is the marker with the hole drilled and the head roughly sized in the table drill.

The 3 & 9 o'clock markers are just that, dial markers. So they are similar in this regard. The 12 & 6 o'clock markers also double up as dial feet. In addition to this the plate thickness under the two is different. So the holes are at different locations.

After this the markers are hardened & tempered. Below you can see them after the heads are further turned down a bit.

And below you can see the dial mounted on the movement, hands sized, minute hand bent, installed & the entire assembly cased up.

I use a drop of oil on the minute hand to check if it clears the crystal.

Here's the final profile of the hands.

Next time I will write about finishing off the hands.

Aditya

Thursday, 20 January 2011

THE COLLECTION: 7 Jewel English fusee from 1873

I have decided to post about watches from my collection here. This way I will have something to post even if there is no work done on no.1-02. Many thanks to crazyfingers for inspiring this idea.

Today I will write about a watch I restored recently. It is a simple seven jewel English fusee in an open-face case. The case is sterling silver & hallmarked for 1873. All the serial numbers match. Typical for this period it is key wound and set.

This is how I received the watch. Overall in good condition but not working. Also, the minute hand was broken. By a stroke of luck, I had a spare hand that fit beautifully. It reaches exactly to the minute track! The balance would not move freely but that was only because of the incredible amount of dirt inside.

Further investigation revealed a few problem. Below you can see the maintaining-power wheel from the fusee. If you look through all the dirt you will notice that one of the clicks is broken. You can also see the spare click I intend to install.

The spare click was installed after some adjustments........

....... and here are all the parts of the fusee ready for lubrication and assembly.

The chain had the fusee hook missing. Upon measurement, it appeared to be all there. So, I decided to install a spare hook that I had. A rivet was filed up, sized and then riveted on the staking set. Below, you can see the hook just before it was riveted which is why the rivet sticks out a bit.

Here are all the parts ready for assembly.

I also disassembled the case. There was rust on almost all the steel parts. All were treated to some Brooke Bond Red Label :-) The button is a replacement made of brass. I decided to retain it since I haven't got a spare.
This watch has been running beautifully for the last few days. I have not timed it accurately but it is within 15 seconds per day. Power reserve is 31.5 hours.

Hope you enjoyed reading about this watch.

Aditya

Tuesday, 11 January 2011

Timeout Magazine

A very happy new year to everyone! I have not written for a long time because I have not worked on the watch in a long time. An illness in the family & the annual holiday we take has kept me away from the bench.

Anyway, I can say that 2011 has begun on a good note for me. The January 2011 issue of Timeout Magazine has a small article about me. Here it is


My sister-in-law, Sasha, mentioned my watch collection to a friend (who works for Timeout Mumbai) and, apparently, they run a half page article every month on people who collect unusual things. I am not sure how unusual watch collecting is but my wife says paying good money for broken pieces of machinery is most certainly unusual :-)

So many many thanks to Sasha!!! Also, many thanks to Sheena D'Lima, reading about oneself helps put things in perspective.


Aditya

Friday, 3 December 2010

Finishing, Part2

If anyone asks 'why anglage?' I would have them compare the images towards the end of this post with the one in the header. I think anglage (or bevelled edges), apart from removing burrs, adds a lot to the overall look of the movement. It gives the forms some definition and makes everything look more 'robust'. Also, I quite like the contrast between the straight grained top and the polished bevel. So here's how I do it. I first break the edges with my Swiss escapement files. These are quite expensive but well worth the outlay. These can do in one hour what my other local files can do in a couple of days.

And here you can see the edge has been broken.

Next I sand the filed edge down with wet & dry papers, 3M micro finishing films and lapping films. These are stuck on a brass strip or a toothpick with double sided tape. This helps to get into difficult corners.
.....very time consuming business but worth it.

And below, you can see the fruits of my labours.....
Hope you enjoyed this.

Aditya